
ASP .NET Ajax File Upload
Posted on by Cosmin Vana
Introduction
This tutorial will show you how upload files with progressbar, without using Flash, HTML5 or similar technologies that the user's browser might not have. If you are looking for a quick way to do this, I must tell you that having a progress bar when uploading a file is not a trivial task, even if is a common requirement. Most solutions rely on flash to be installed on your computer, and if you already have the code with normal file upload, prepare to modify your code a little, because it won't be just a tag and a function call.
This is not a "how to" tutorial. This will present the technical part of the project that I am developing. You can download the source code from codeplex.
Web Server Requirements
-
ASP .NET Server with .NET Framework 4.0 (or 4.5)
-
ASP MVC 3.0 (or 4.0). The code can be adapted for Web Forms too.
Client Requirements
-
Javascript enaled on browser
How it works
How IIS handles upload requests
First, let's see how an ASP .NET applications works on the web server. In order to upload large files, we have to set some things in Web.Config. Applications are configured by default to reject all requests that are bigger than 4MB. To allow uploading larger files you have to set maxRequestLength. The maxRequestLength is set up in kilobytes. Here is an example that will set up a maxRequestLength of 2GB.
<httpruntime maxrequestlength="2097152" executiontimeout="600" />
If you are using IIS 7, you must also add the following lines in Web.Config, under de system.webserver node. This adds the same limit of 2GB, but it is specified in bytes.
<security>
 <requestFiltering>
 <requestLimits maxAllowedContentLength="2147483648"></requestLimits>
 </requestFiltering>
</security>
Another property that ASP.NET uses when we are working with big requests and can be set up in Web.Config is requestLengthDiskThreshold. This is also a property of httpRuntime. Its value should not exceed maxRequestLength or a ConfigurationErrorsException will be raised. This is a treshold, and if the request length is bigger than this threshold, it will be buffered on disk, in a temporary file. According to MSDN for maxRequestLength, this threshold is 80 kb. But if we look at HttpPostedFile documentation, we see that by default, all requests, including form fields and uploaded files, larger than 256 KB are buffered to disk, rather than held in server memory.
You can tune your website performance using this attribute, but for our example it doesn't matter if we have a limit of 80kb or 256kb. This happens internally and does not affect the way we write our code. It's important to know that this "write to disk" already happens for a request bigger than a certaing treshold, so what you'll see next does not have a big performance impact if you've never tuned your application using requestLengthDiskThreshold.
How is a file sent over HTTP
Let's say we have the following text file:
 Hello from vanacosmin.ro
 This tutorial will show you how upload a single file with a progress bar.

 I will close the file, using a dot as the last character.
If I make a simple fileupload page and use it to send this file, this is how the request to the server looks like (captured with fiddler2):
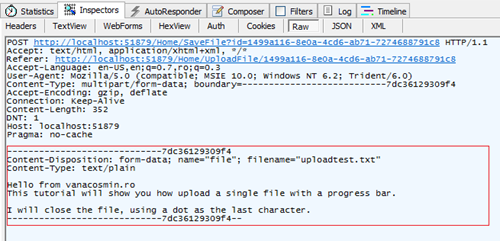
The top part are the headers that are transmitted. The second part (in a red square) is the content.
Headers
The headers are important to analyze because we will use them. As soon as the headers arrive to the application, Application_BeginRequest from Global.asax is triggered. This means that the file is not yet completely uploaded but we already have a signal into our application. The following are the headers that we may use:
- Referer: can be used for security (it won't be used in this example)
- Content-Type: can be used to filter the requests. All the requests get through Application_BeginRequest, but we want to precess asynchronously only the ones with file
- Content-Type boundary: is a series of characters that are used by HTTP in the content part as a delimiter between variables. If we had more files, after the last delimiter in the red box we would have the data of the next file, and after that another delimiter
- Content-Length: the length (number of bytes) of all the content (all the files headers and data, delimiters, starting and ending characters grouped together)
Unfortunately, the headers tells us that if we use a file input with multiple files (we can select multiple files on one dialog) we won't be able to know the size of each file until they are completely loaded to the server (the content is completely uploaded). This is why we can have a progress bar only for the whole request.
Content
As soon as the Application_BeginRequest starts we have access to the headers. At this time, the Request object can't be fully accessed. We can use Request.Headers, but if we use Request.Files or Request["somekey"], the thread will stop there until it loads the entire content. The content of the Request can be found in Request.InputStream. All the other APIs (Request.Files, Request["somekey"]) are populated after the Request.InputStream is loaded. We can't wait until the request is fully loaded to send information about how much it has been loaded. Using Request.InputStream will also enforce waiting until the whole request is loaded.
Sience .NET Framework 4.0, we have Request.GetBufferlessInputStream() method. This method returns a stream. We can read from this stream while content data is comming to the server and process it. For example, we now from Content-Length server the total number of bytes, and we read from this stream and know how much we were already able to read.
The not so nice part is that once you call this method you can no longer use Request.Files or any other of the request APIs because you'll get the following exception:
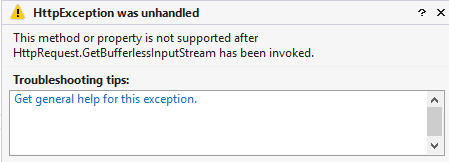
This means that your MVC method must have no parameters, because the binding will try to access APIs from the Request object. This also means that you can't use in your method Request.Files to save your files. You have to do somthing else about it. You have to save the files somewhere, while they are read, because if not, the data is lost. Basically, what I said eralier about the webserver (saves the request stream in a temporary file if it has more than a certain size) must be done by us while reading the data from the stream.
According to ASP .NET 4.5 Release Notes, we might improve this when upgrading, as we can use GetBufferedInputStream() method which does not invalidate the other Request APIs. I will come back with an article after I will try this out.
Create sample project
Create a new Empty MVC3 Application (or Basic MVC4 Application). If you want to integrate this solution in your application you should follow this tutorial to understand how it works in order to design the changes that needs to be done in your code.
Controllers and Views
1. Create a controller called Home with the following code:
/* HomeController.cs */
public ActionResult Index()
{
 ViewBag.FileId = Guid.NewGuid(); return View();
}

public PartialViewResult UploadFile(Guid id)
{
 ViewBag.FileId = id; return PartialView();
}2. Create the following Views:
@{
 // Views/Home/index.cshtml
 ViewBag.Title = "Index";
}
<h2>Index</h2>
<iframe src="@Url.Action(" UploadFile", new { id=ViewBag.FileId })"></iframe>
<p id="progress"></p>
<!-- Views/Home/UploadFile.cshtml -->
<html>
<head>
<title>FileUpload frame</title>
</head>
<body>
<form method="post" enctype="multipart/form-data" action="/Home/[email protected]" data-upload="bla">
<input type="file" name="file">
<input type="submit" value="Upload">
</form>
</body>
</html>You navigate to http://localhost/Home/Index and the first view is shown. A random GUID is generated to identify the file. An iframe is used for the file form, because we don't want to block the UI when we post the file (files POST with ajax is not possible unless you have XMLHttpRequest Level2 in your browser)
In the form, you see that we post to Home/[email protected], instead of sending the id in a hidden field or something. So, even if we POST the form, we send the ID as query string parameter. This is because we use the ID to save the file while loading it in Application_BeginRequest, where we have the query string, but we can't check for posted data yet.
You navigate to http://localhost/Home/Index and the first view is shown. A random GUID is generated to identify the file. An iframe is used for the file form, because we don't want to block the UI when we post the file (files POST with ajax is not possible unless you have XMLHttpRequest Level2 in your browser)
In the form, you see that we post to Home/[email protected], instead of sending the id in a hidden field or something. So, even if we POST the form, we send the ID as query string parameter. This is because we use the ID to save the file while loading it in Application_BeginRequest, where we have the query string, but we can't check for posted data yet.
Reading Request.GetBufferlessInputStream()
3. Add the following class to your project:
/* Author: Vana Genica Cosmin */

using System;
using System.Collections.Generic;
using System.IO;
using System.Text;
using System.Web;

namespace FileUpload
{
 public static class CFileUpload
 {
 private static IDictionary<guid, int>
 requests = new Dictionary<guid, int>
 ();


 public static void RegisterHandler(HttpRequest request, string path)
 {
 Guid id = Guid.Parse(request.Url.Query.Substring(request.Url.Query.IndexOf("=") + 1));
 string filename = id.ToString() + "1";
 string directory = path + @"\" + id.ToString();
 Directory.CreateDirectory(directory);
 string fileFullPath = directory + @"\" + filename;
 string fileHeader = null;
 string realFileName;


 if (requests.ContainsKey(id))
 throw new Exception();
 requests.Add(new KeyValuePair<guid, int>
 (id, 0));


 using (Stream stream = request.GetBufferlessInputStream())
 {
 using (FileStream fs = new FileStream(fileFullPath, FileMode.OpenOrCreate))
 {
 long size = long.Parse(request.Headers["Content-Length"]);
 int maxIterations = (int)(size / (64 * 1024));


 int chunkLength = 64 * 1024;
 byte[] buffer = new byte[chunkLength];
 int dataCaptured = 0;
 for (int i = 0; i <= maxIterations; i++)
 {
 if (i < maxiterations)
 {
 stream.read(buffer, 0, chunklength);
 datacaptured += chunkLength;
 }
 else
 {
 buffer = new byte[(int)stream.length - datacaptured];
 stream.read(buffer, 0, buffer.length);
 }
 int positiontoremove = 0;
 int bytestoget = buffer.Length;
 if (i = = 0)
 {
 int numberoffounds = 0;
 bool canbe = false;
 for (int j = 0; j < buffer.Length; j++)
 {
 if (buffer[j] == 13)
 {
 canBe = true;
 }
 else
 {
 if (canBe && buffer[j] == 10)
 {
 numberOfFounds++;
 if (numberOfFounds == 4)
 {
 positionToRemove = j + 1;
 byte[] headerBytes = new byte[positionToRemove];
 Array.Copy(buffer, headerBytes, positionToRemove);
 fileHeader = ASCIIEncoding.ASCII.GetString(headerBytes);
 bytesToGet = buffer.Length - positionToRemove;
 break;
 }
 canBe = false;
 }
 else
 {
 canBe = false;
 }
 }
 }
 }


 if ((int)stream.Length - buffer.Length - dataCaptured <= 49)
 {
 bytesToGet = bytesToGet - 48;
 }


 fs.Write(buffer, positionToRemove, bytesToGet);
 requests[id] = (int)((float)((float)(i + 1) * ((float)size / maxIterations) / size) * 100);
 }


 int filenameStartIndex = fileHeader.IndexOf("filename=\"") + "filename=\"".Length;
 int filenameEndIndex = fileHeader.Substring(filenameStartIndex).IndexOf("\"");
 realFileName = Path.GetFileName(fileHeader.Substring(filenameStartIndex, filenameEndIndex));
 }
 }


 File.Move(fileFullPath, fileFullPath.Replace(filename, realFileName));
 }


 public static int CheckProgress(Guid id)
 {
 if (requests.ContainsKey(id))
 return requests[id];


 return -1;
 }
 }
}
This class provides two main functionalities: first, it takes the request and reads with "while it comes" and saves the file in a given location, while keeping the progress of that speciffic request in a dictonary, where the key is the guid we are sending in the url with the file. Second, it provides a method where you can check the file's progress using the id. We use a static fields to keep this information, because we can't use seesion in Application_BeginRequest (the session is created only after cookies have arrived).
4. In Global.asax add the following code, replacing E:\TempFiles to a folder where your application has rights to write:
protected void Application_BeginRequest()
{
 if (Request.Headers["Content-Type"] != null &&
 Request.Headers["Content-Type"].StartsWith("multipart/form-data;") &&
 Request.Headers["Content-Length"] != null)
 {
 CFileUpload.RegisterHandler(Request, @"E:\TempFiles");
 }
}
Get the progress notification
While the file is uploading, we have the progress in CFileUpload class and we can get it by using the CheckProgress method. We will make a server-side method that will take an id and will return the progress of the file with the specified id. This will by called by ajax, so make sure it is not cached by the browser. In HomeController add the following method (no cache attribute included):
[AjaxNoCache]
public ActionResult Status(Guid id)
{
 return Json(new { isok = true, message = CFileUpload.CheckProgress(id) }, JsonRequestBehavior.AllowGet);
}

/* Get this in an external file. This is an attribute that will ensure the ajax callresponse is not cached by the browser */
public class AjaxNoCacheAttribute : ActionFilterAttribute
{
 public override void OnResultExecuted(ResultExecutedContext filterContext)
 {
 if (filterContext.RequestContext.HttpContext.Request.IsAjaxRequest())
 {
 filterContext.HttpContext.Response.Cache.SetExpires(DateTime.UtcNow.AddDays(-1));
 filterContext.HttpContext.Response.Cache.SetValidUntilExpires(false);
 filterContext.HttpContext.Response.Cache.SetCacheability(HttpCacheability.NoCache);
 filterContext.HttpContext.Response.Cache.SetNoStore();
 }
 }
}
In index.cshtml add a repeated call to this method by adding the following code at the end of the file:
<script type="text/javascript">
 progress = 0;
 function checkForProgress() {
 $.ajax(
 {
 url: "@Url.Action("Status", "Home", new { id = ViewBag.FileId })",
 success: function (returnvalue) {


 if(returnvalue.isok) {
 progress = returnvalue.message;
 document.getElementById("progress").innerHTML = progress;
 setTimeout(checkForProgress, 200);
 } else {
 /* display error or something */
 }


 }
 });
 }

 setTimeout(checkForProgress, 1000);
</script>
Finally, let's create the action where we post the file. We do a lot of things in Application_BeginRequest() before this is executed, but ultimately, this is where you do whatever you want with the file, after it was completely uploaded. We could use the code below:
[HttpPost]
public string SaveFile()
{
 /* you can't use Request["id"], but you can take the id from the url, and based on the id and the folder where you
 saved the file, you can copy it wherever you want */
 return "Uploadcomplete";
}
Now set the maxRequestLength in Web.Config as described at the top of the article, run the application and try to upload a big file (under 2GB).
Conclusions
Using Request.GetBufferlessInputStream() we can monitor the progress of a file upload. This was a technical sample of my work and was not meant to be a "how to" tutorial, but to introduce you in the technical complexity of this method. I am developing a project using this concept. If you have anything to say, please join the project or leave a comment.